Stampin" Up's® Statement of the Heart
To love what we do and share what we love, as we help others enjoy creativity and worthwhile accomplishments....in this we make a difference!

I have just had some fun creating this Thankyou card using sponging and Stampin' Glitter®. I love the added dimension and rustic charm they give to the card. I have used my Stampin' Up® slit punch (pg 140) to create a scallop edge on the pretty in pink paper. I have used my own decorative scissors to mimic the scallop edge on the white matte. Versamark (pg 145) has been used to stamp background on the card (used Fresh Fillers stamp set, pg 100). Petal Prints (pg68) & Favorite Teddy Bear (pg 46) are the images used for the front design. All I have done to get the smudged look around the colour cardstock and white matte is by using wedges of the stamping sponges (pg 143) dipped in Stamping' Up® ink stamp pads and sponged directly on the edges. Can also use sponge daubers (pg 143) to get similar effect. Ink colours used here are pixie pink, marigold morning and perfect plum. The bow on the flowers and glitter strip have been created using Stampin' Glitter® (pg 145) and Sticky strip (pg 142). It is very easy!! Just place strip of sticky strip where you want on the card, peel off the backing tape and sprinkle with Stampin' Glitter® (good idea to do this over some scrap paper, as glitter does like to go everywhere). Tap excess glitter off the card and you are left with glitter image. I LOVE IT!!! No more sticky mess with glue, and glitter where you don't want it. Best of all, the excess glitter from scrap paper can be put back into container ready for next time, wasting none. Have a go, it really adds a little 'bling' to your cards.
I am having a workshop tomorrow, and the hostess requested some Christmas designs. This is one of the cards I have adapted from a design on Splitcoast Stampers. It uses Stampin' Up® stamp set Hung Up on the Holidays (pg 24). I LOVE this set. The price is quite reasonable too, $29.95 for 6 stamps!!! I have made this card using the In Colour range (pg 127). The card is made from buckaroo blue, while the mattes are cranberry crisp and whisper white. The inks used for the ornaments are all from the In Colour range as well. True thyme, cranberry crisp, buckaroo blue and marigold morning. The ornament strings are basic black. Too add a little 'dazzle', I used the Stampin' Around ® Twinkle (pg 25) at the bottom of the card and inked it with a silver Encore® pad. I have hand written the Merry Christmas under the star. I am surprised, that although the colours are not what you'd call Christmasey, the card has a holiday season feel to it. It definitely makes me want to try other colours for my Christmas cards this year to make them a little different from the everyday ones. Maybe you can give it a try too!!!
 I just wanted to share with you one of my hostess gifts I made. I found the template for this cute 3"x3" card box on Splitcoast Stampers (where else)!! It was created by Andrea Walford (blog site listed to the left). The box itself is made using Stamping Up
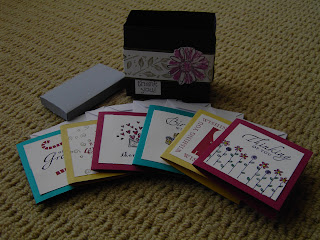 ® cardstock. All the colours are from the rich regals range. The base is made from elegant eggplant, and accented with always artichoke, while the lid is made from bordering blue. The 3"x3" cards are made from rose red, taken with teal & so saffron. Whisper white cardstock has been used for mattes. I made my mini envelopes from a site I found on the internet (free of course). The Stampin' Up® stamps sets used were Petal Prints (pg 68) on the card box as well as Favorite Teddy Bear (pg 46) for the thank you tag. On the mini cards I have used Greetings Galore (pg 42), Simple Somethings (pg 44), Favorite Teddy Bear (pg 46), Sincere Salutations (pg 117), Fresh Fillers (pg 100) and Wishing You (pg 3) from the Mini Spring Catalogue. Obviously, you would not need to use all these stamp sets to create gorgeous little cards, but I wanted to experiment with a range of sets. I am really happy with the finished product......it really is CUTE!!! I will be definitely making it again.
 Just thought I would share another of my creations with you. It is a mini album made from chipboard coasters. The first photo is a closed view (above), and the second gives you an idea of what it looks like opened (below). It is a lovely project to make as a gift for family or friends, and it is so easy to do. I have just covered the coasters in co-ordinating paper and cardstock I had leftover from my scrapbook pages, but the double sided designer series paper from Stampin' Up® on pg 133 would look great. The stamp set is Stampin' Up's® All About U (pg 115). I have sealed the papers with modge podge and then embellished with paper flowers, brads, ribbon etc. All that needs to be added now are the photos. I just have to decide which ones. Now if you love embellishments as much as me, Stampin' Up® has a great promotion running from the 1st September-28th September. When you purchase a Starter Kit you can choose a free Hodgepodge Hardware set (located on pg 146), valued at $52.95 for free. If you would like to know more, or are interested, please call or email me with any questions. I am always happy to have a chat. Till next time, happy scrapping, stamping, crafting etc etc.

So excited. Went to the Stitches & Craft show in Sydney on Thursday. My Mum actually discovered this useful tool by Zutter Innovative Products, called Bind it All. As the name suggests, it punches and binds things. LOOK at what I've done!! This is a blank notepad/journal that I have made from my Stampin' Up® products, Bind it All and miscellaneous embellishments. The paper I have used is elegant eggplant (pg 129) for the cover, and whisper white (page 127) for the inner pages. The stamp set is Wonderful Words II (page 114) . The flowers and brads I purchased at the Stitches and Craft show (on sale of course), and I am really happy with the finished project. I can't wait to bind other projects.....calenders, to do lists, boxes, chipboard, CDs, the possibilities are endless.
This template for an album box I got from splitcoast stampers, and I think it is so cute. It would make a great present for a friends birthday, mothers day, fathers day, christmas etc. I have used papers from the Stampin' Up® In Colour range (true thyme & cranberry crisp) as well as some offcuts from scrapbook pages. The Stampin' Up® stamp sets I have used include Petal Prints (pg 68) All About U (pg 115) and the Linen background stamp (pg 106). These are photos of the results. Hope you like!!

Welcome to you all. For someone as computer illiterate as me I can't believe I have my own blog. There has been many tears and frustrations, but here I am. I hope that you will find this site useful. This is the way I hope to communicate all upcoming events and classes, rather then the monthly newsletter. I would appreciate any feedback you might have. Remember that I am having a scrapbook night on Friday 28th September at my house @ 7pm. For a cost of $25 all supplies and instructions will be provided to make your own 20 page 6x6 scrapbook, you just need to let me know which designer series paper you would like from page 132 of the Stampin' Up® catalogue (view online if you do not have a catalogue), and bring an album for your pages (available from spotlight for $7). Light refreshments and supper is included. Class sizes are maximum of 10. Please contact me if you are interested or have any further questions. I will run future classes if the need arises.